
In the era of automation, we generally make our automated projects which are robust in every platform and situation. Sometimes, whatever scripts that we make, work in our local system as well as in public platform but when we try to run those scripts in restricted environments like office or secured places then these scripts fail due to some restrictions. One of the prominent restrictions is PROXY in this case. In this article, we will understand the basic introductory aspect of Proxy. Also, we will see that how to resolve Proxy related problem through manual as well as automation. Let`s start our journey with understanding the following details:
- What is the concept of Proxy?
- What are the different reasons to use Proxy Servers?
- How to set Proxy Manually?
- Setting Proxy in Chrome browser?
- Setting Proxy in Firefox browser?
- Setting Proxy in Internet Explorer browser?
- How to set Proxy via Selenium webdriver through Automation?
- How to set Automatic Proxy configuration URL through webdriver code?
- How to handle alert based authentication through webdriver code?
- What is the concept of Proxy?
A proxy or proxy server is basically an interface between client and server. Here, client is our machine through which we can send requests and server is the other machines on web. We can consider proxy as another layer of security or firewall between client and web servers. Let’s understand the concept of proxy with the help of real life example.
Basically, in our office environment, some websites are restricted to open. So, when we try to run our automation scripts on those websites then it does not allow us to access those websites because of restrictions imposed by organization. Hence we will not be able to run our automation code. It may be possible that we may able to run that code in our local system because there is no restriction inside our machine. In this case, network team suggests us to set proxy in our system to run the code. The whole process is called “Content filtering” in which we are authorized to access only restricted content.
Now, there are two ways to set proxy – manually as well as automation. In the further sections, we will explore the demonstration of setting the proxy manually as well as through automation.
- What are the different reasons to use Proxy Servers?
In the previous section, we understood the introductory concept of Proxy. Now, in this section, let’s see the different types of reasons for using Proxy servers inside the different organizations:
- Filtering the contents on the internet.
- It blocks the restricted as well as personal websites in the office environment.
- Generally, websites will block IPs that makes too many requests due to the security reason and Proxy is the way to do it.
- It is useful to capture network traffic like downloading as well as uploading happening on that website.
- It is useful to provide anonymity while surfing the internet.
Above reasons are some important reasons due to which office environments as well as secured organizations use the concept of Proxy. Now, in the next section, let’s go to the practical implementation of setting up the proxy manually as well as through automation.
- How to set Proxy Manually?
Alright, so in the previous section, we discussed about the reason that why we generally use proxy server in organization. Now, the question comes into mind is that how can we set the proxy in different browsers. So, in this section, let’s see the practical demonstration about setting proxy in most common browsers like Chrome, Firefox and Internet Explorer:
- Setting Proxy in Chrome browser:
Kindly follow the below steps to set proxy in Chrome browser:
Step 1: Open the Chrome browser, click on the top three dots at the top right corner and click on “Settings” option.

Step 2: As soon as we will click on settings options, a new window will be opened. Now expand the “Advanced” option and click on “System” link.

Step 3: As soon as we click on System link, some options will be displayed on screen and here we need to click on option “Open your computer’s proxy settings”.

Step 4: As soon as we click on above mentioned option, we redirected towards proxy settings of computer system and here under Manual proxy setup section, we need to toggle the “Use a proxy server”, put address and port inside textbox and click on save button.

Step 5: Now, we can validate whether proxy is manually set or not with the help of below steps:
- Open control panel and click on “Internet Options”.
- Go to the connections tab.
- Click on “LAN settings”.
- Under the Proxy server section we can see the same address as well as port that we have already setup in previous step.
So, in this way, we can setup the proxy in chrome browser. In the next subsection, let’s see that how to setup proxy in Firefox browser.
- Setting Proxy in Firefox browser:
Kindly follow the below steps to set proxy in Firefox browser:
Step 1: Open the Firefox browser, expand Tools tab and click on “Options” option.

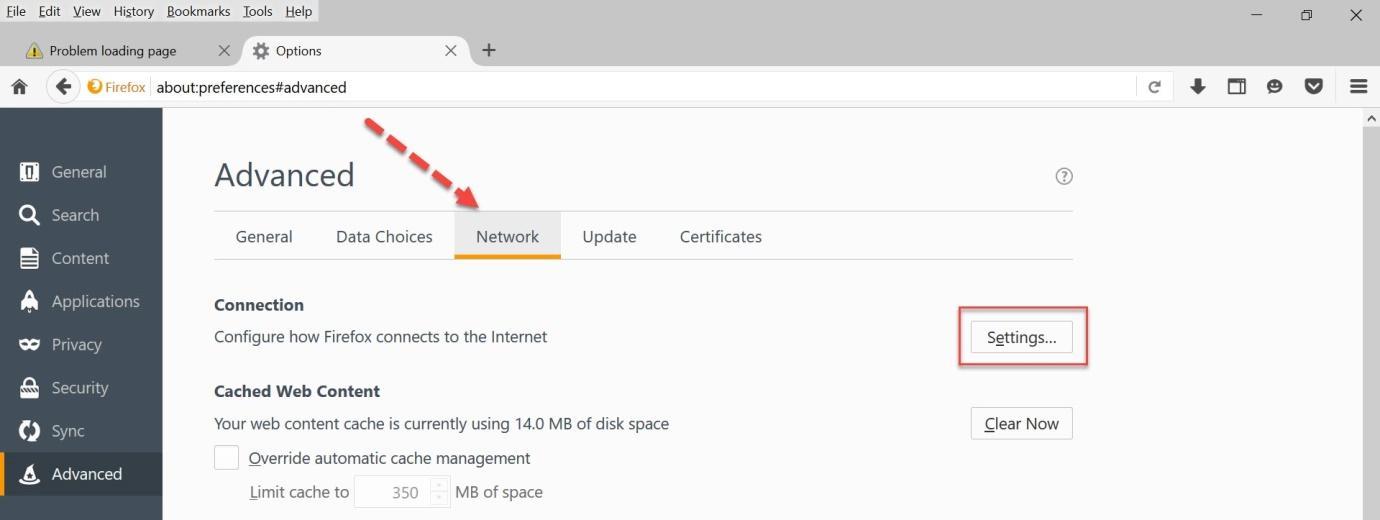
Step 2: As soon as we click on options link then we redirected towards a new window. Now click on “Advanced” tab highlighted in the below image:
Step 3: Now, under advanced section, go to “Network” tab and click on “Settings” button highlighted in the button.
Step 4: After clicking on settings, new pop up window will be opened. Kindly follow below steps to set proxy:
- Click on radio button “Manual Proxy Configuration”.
- Put the HTTP Proxy as well as port.
- Click on Ok button.

So, in this way, we can setup the proxy in Firefox browser. In the next subsection, let’s see that how to setup proxy in Internet explorer browser.
- Setting Proxy in Internet Explorer browser:
Kindly follow the below steps to set proxy in Internet Explorer browser:
Step 1: Open the Internet Explorer browser, click on setting icon highlighted via arrow sign and click on “Internet options” option.

Step 2: As soon as we click on Internet options, new pop window will be opened. Go to connections tab and click on “LAN settings” button.

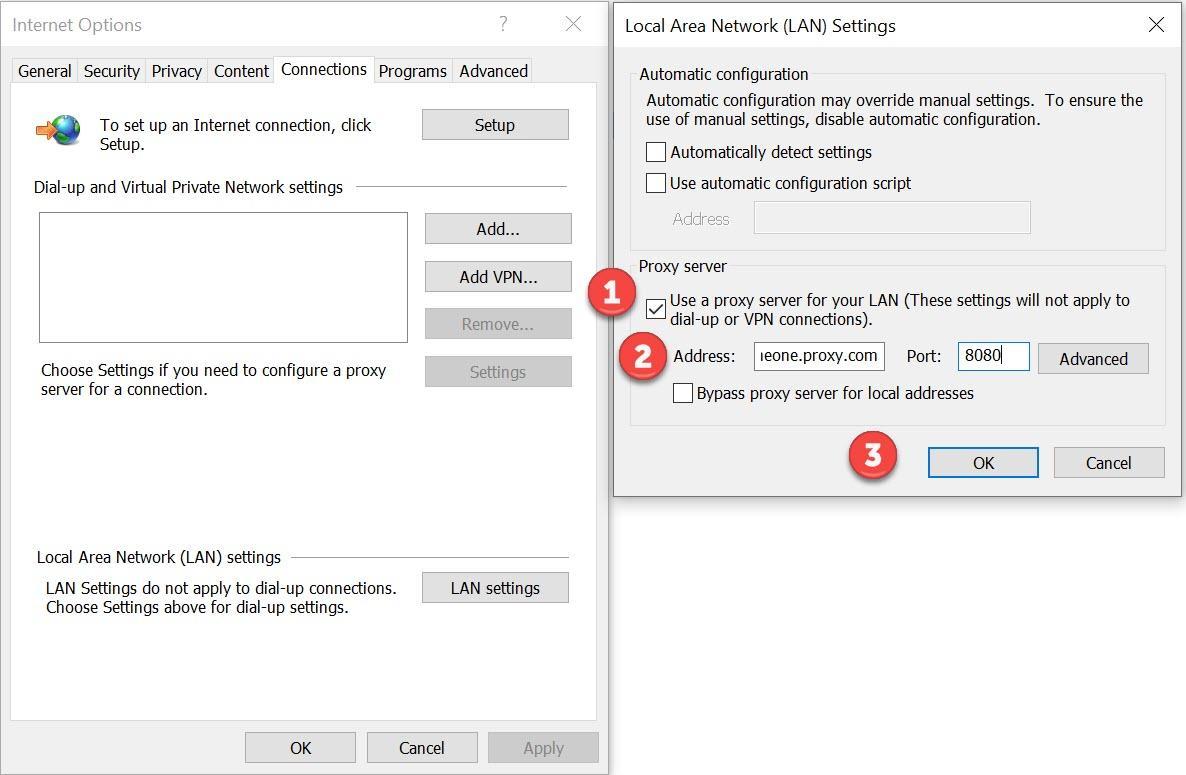
Step 3: As soon as we click on LAN settings button, a new pop up window will be opened. Kindly perform the below steps to set proxy:
- Check the checkbox against point 1 in below image.
- Put the address as well as port.
- Click on Ok button.
So, in this way, we can setup the proxy in Internet explorer browser. In the next section, let’s see that how to setup proxy through automation via selenium webdriver code.
- How to set Proxy via Selenium webdriver through Automation?
In the previous section, we saw that how to set proxy manually in different browser. So, in this section, we will see the same above process but with the help of automation through Selenium webdriver code. Let’s take the example of Firefox browser. Kindly follow the below steps to set proxy through automation:
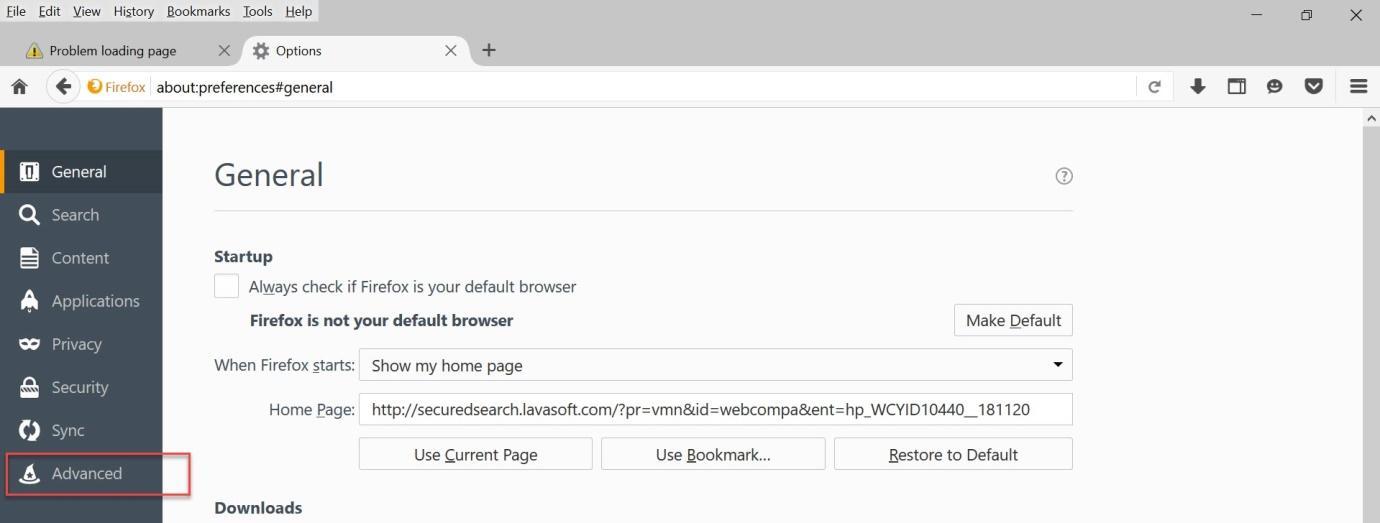
Step 1: Firstly we will validate that no proxy should be set in Firefox browser as shown in below image:
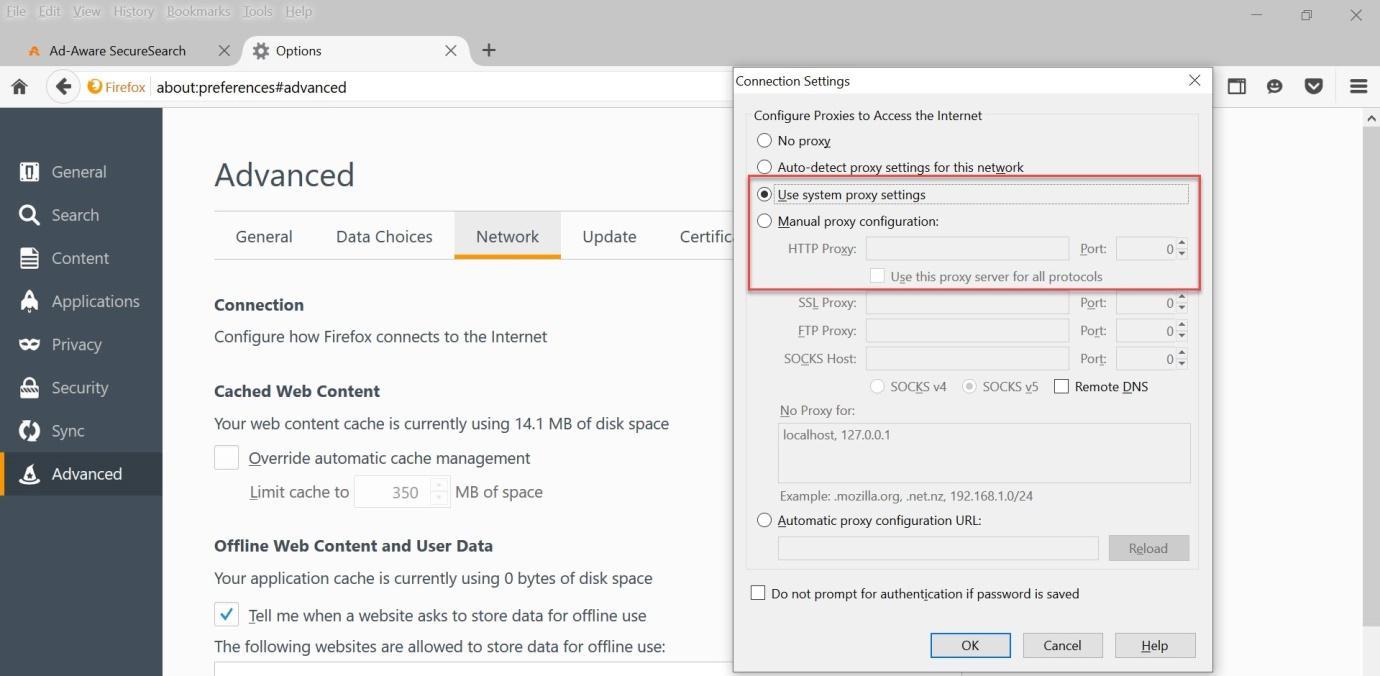
So, in the above image we can see that no manual proxy configuration is set.
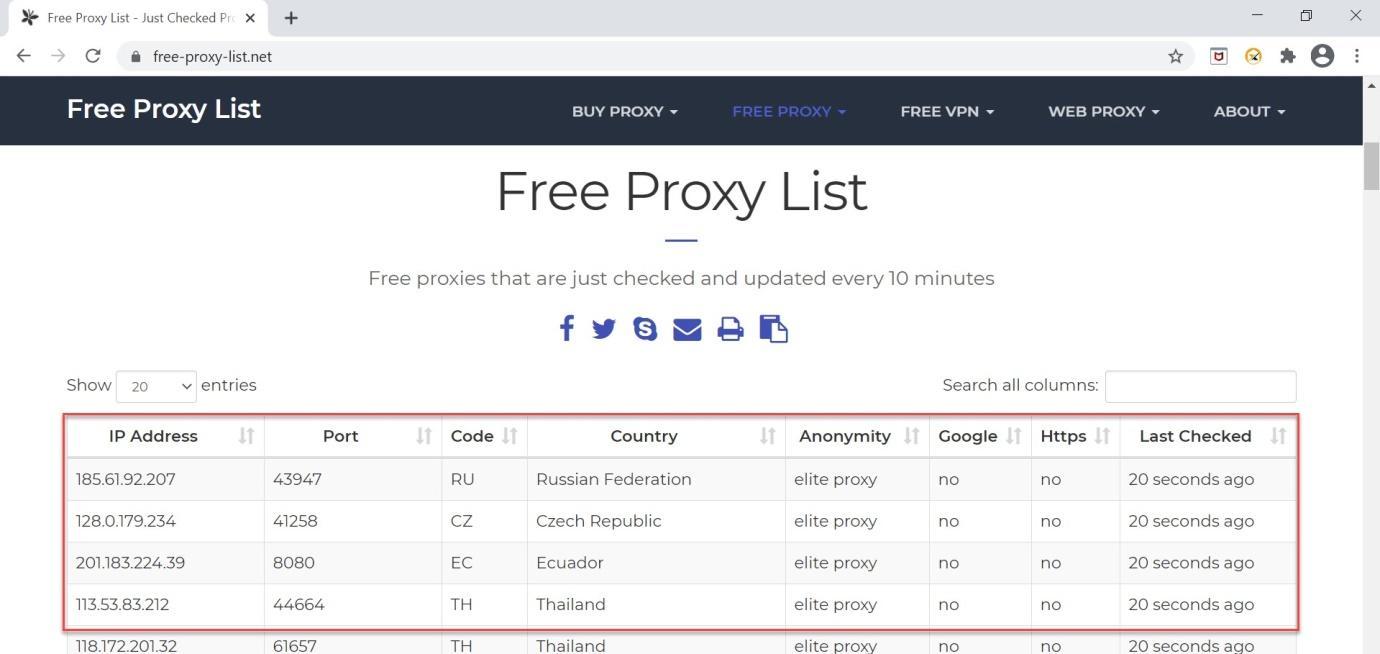
Step 2: We need to find out the proxy also that we want to set in our code. In the organization, either network team can give the <address:port> or system will show itself the <address:port> but here for demonstration purpose, we extracted the mock proxy from the website https://free-proxy-list.net/. We can use any other website also to extract the mock proxies.
Step 3: Now, we need to write the below code to set the proxy through selenium webdriver code. Explanation of every line of code is mentioned against each line in the below code snippet.
// Name of Package
package SeleniumSessions;
//Import required libraries
import org.openqa.selenium.Proxy;
import org.openqa.selenium.WebDriver;
import org.openqa.selenium.firefox.FirefoxDriver;
import org.openqa.selenium.remote.CapabilityType;
import org.openqa.selenium.remote.DesiredCapabilities;
//Name of class
public class ProxyTest {
// Main method started from here
public static void main(String[] args) {
// Create Proxy class object
Proxy p=new Proxy();
//Set Proxy with the help of setHttpProxy method defined in Proxy class. Proxy will be set in the form of <address:port>
p.setHttpProxy(“89.187.177.103:80”);
// Create DesiredCapabilities class object
DesiredCapabilities dcap= new DesiredCapabilities();
// Define CapabilityType as Proxy inside setCapability method of DesiredCapabilities class and pass object also
dcap.setCapability(CapabilityType.PROXY, p);
//Set the path of gecko driver as we need to launch firefox browser
System.setProperty(“webdriver.gecko.driver”, “D:\\Softwares\\geckodriver.exe”);
//Launch the firefox browser with capability defined in above steps
WebDriver driver=new FirefoxDriver(dcap);
//Launch the required URL
driver.get(“https://www.lambdatest.com/”);
}
}

Note: Path of gecko driver like “D:\\Softwares\\geckodriver.exe” mentioned in the above script is the directory path of my machine. You need to set the directory path according to your machine.
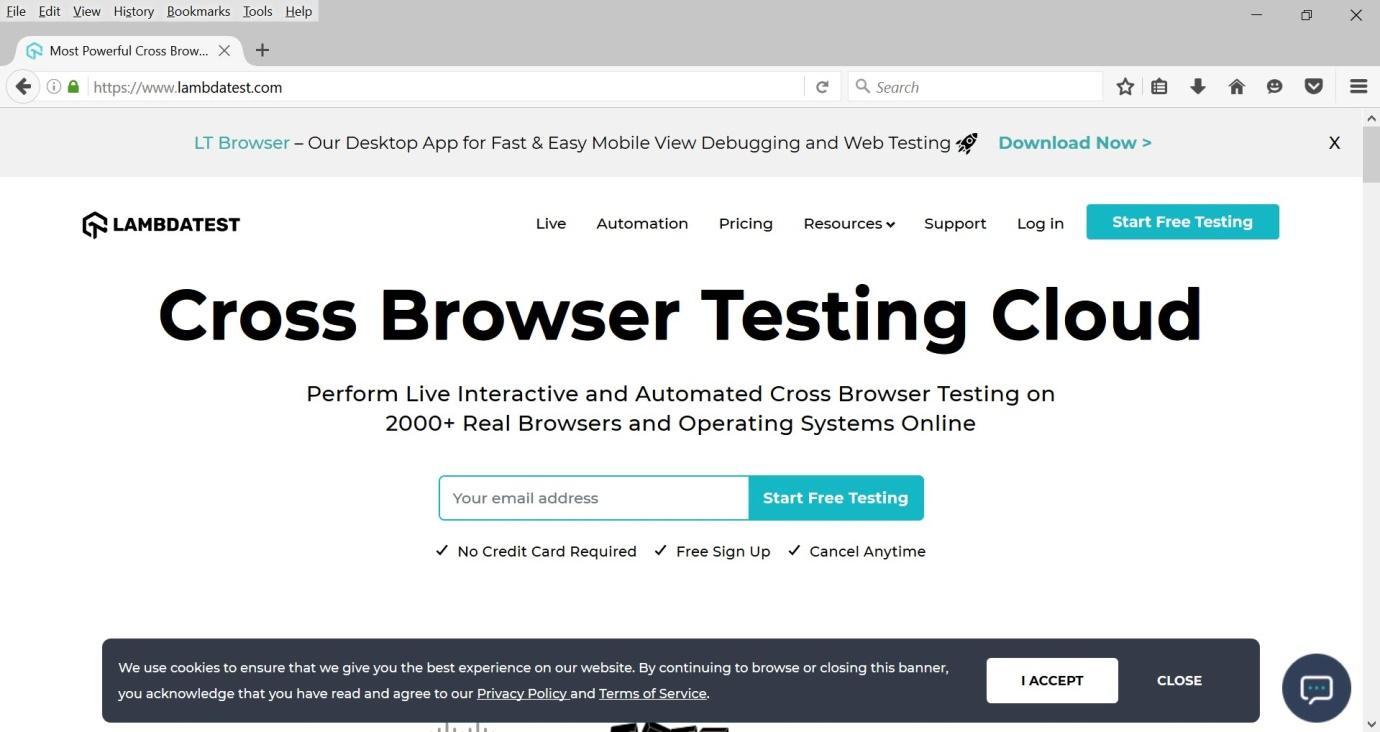
Step 4: Now, run the above script and see whether the required URL is launched in Firefox browser.
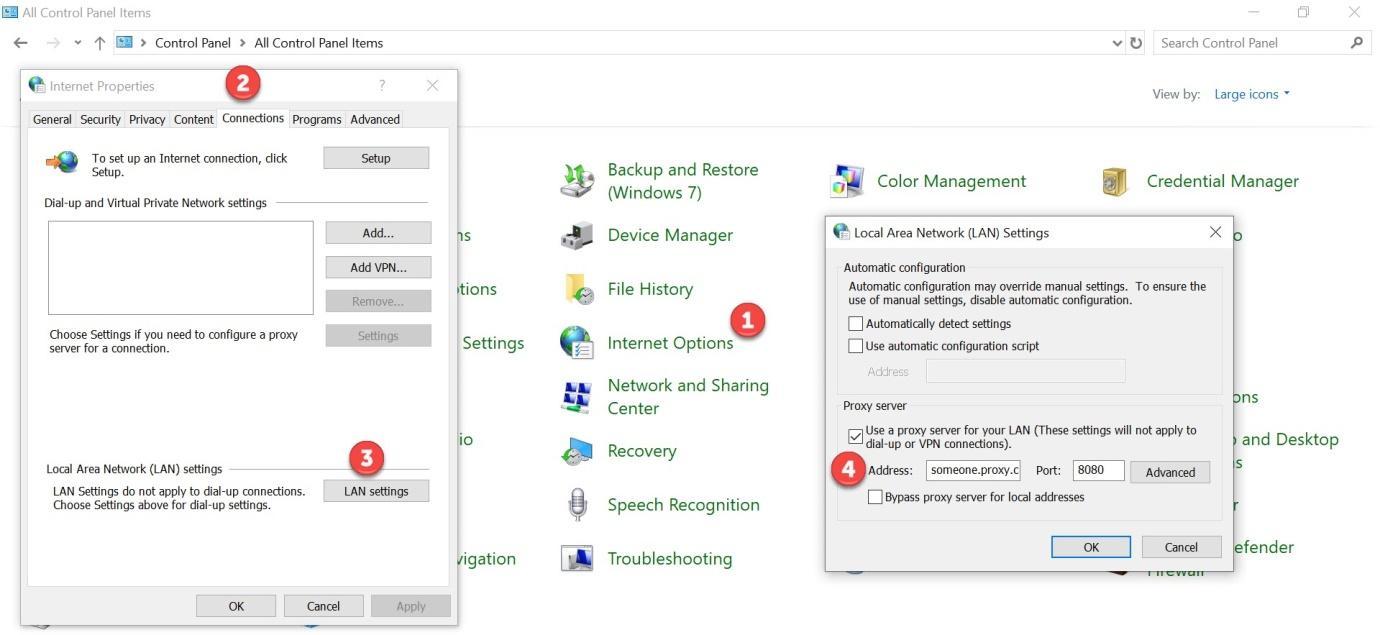
Step 5: Now, in the same launched browser through the above step, go to the Proxy settings and see whether the proxy mentioned in the code is set in the browser or not.
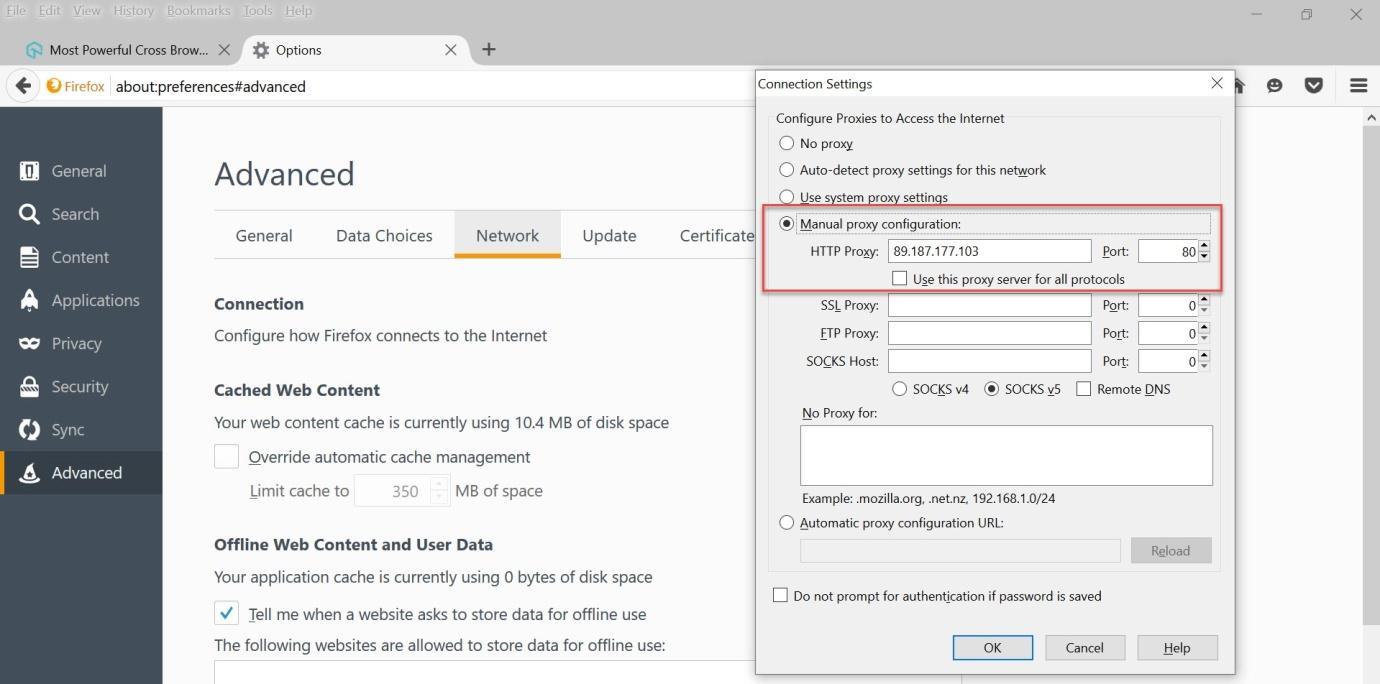
In the above image we can see that now proxy is set in the Firefox browser. So, in this way we can set the proxy in Firefox browser. In the next section, let’s see how to set an automatic proxy configuration URL in the browser.
- How to set Automatic Proxy configuration URL through webdriver code?
Sometimes, we need to set an automatic proxy configuration URL in the browser. So, in this section, we will see how to set an automatic proxy configuration URL through webdriver code. Please follow the below steps to set automatic proxy configuration URL:
Step 1: Firstly we will validate that no proxy configuration URL should be set in browser as shown in below image:
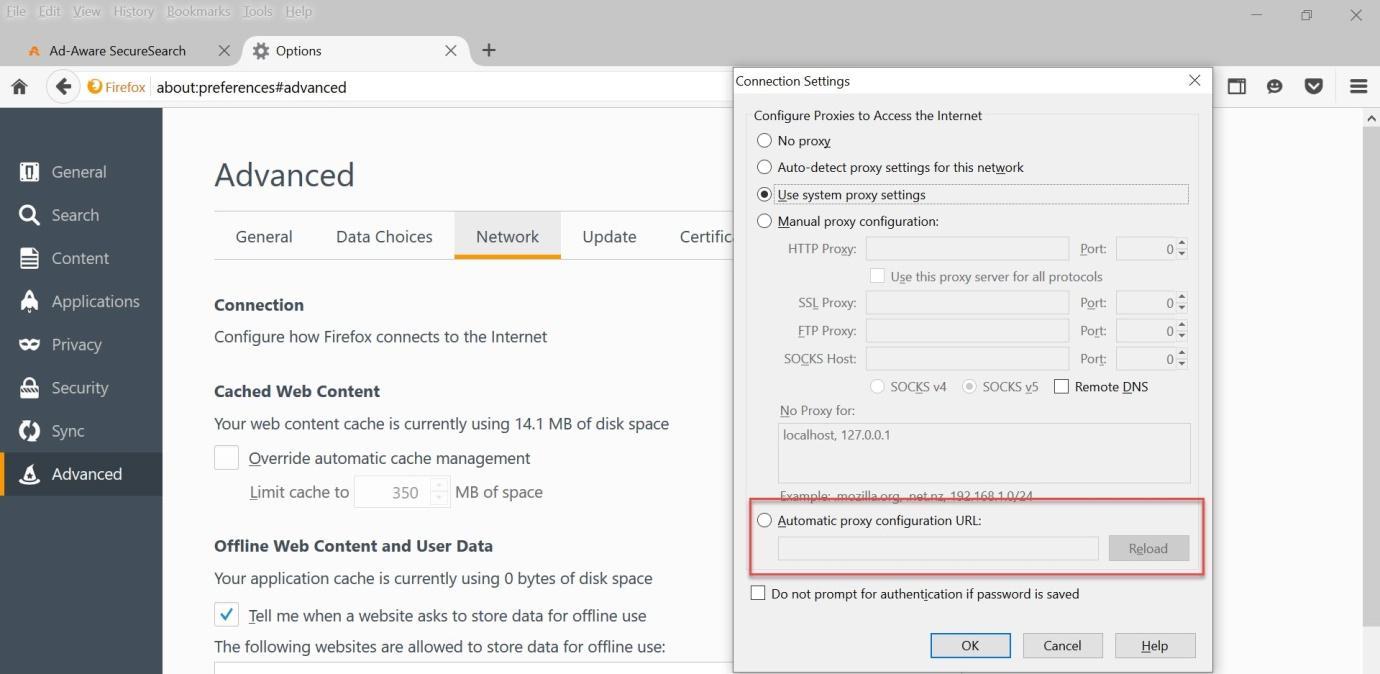
So, in the above image we can see that no automatic proxy configuration URL is set.
Step 2: Now, we need to write the below code to set the automatic proxy configuration URL through selenium webdriver code. Explanation of every line of code is mentioned against each line in the below code snippet.
// Name of Package
package SeleniumSessions;
//Import required libraries
import org.openqa.selenium.Proxy;
import org.openqa.selenium.WebDriver;
import org.openqa.selenium.firefox.FirefoxDriver;
import org.openqa.selenium.remote.CapabilityType;
import org.openqa.selenium.remote.DesiredCapabilities;
//Name of class
public class ProxyTest {
// Main method started from here
public static void main(String[] args) {
// Create Proxy class object
Proxy p=new Proxy();
//Set automatic Proxy configuration URL with the help of setProxyAutoconfigUrl method defined in Proxy class.
p.setProxyAutoconfigUrl(“someone.proxy.com”);
// Create DesiredCapabilities class object
DesiredCapabilities dcap= new DesiredCapabilities();
// Define CapabilityType as Proxy inside setCapability method of DesiredCapabilities class and pass object also
dcap.setCapability(CapabilityType.PROXY, p);
//Set the path of gecko driver as we need to launch firefox browser
System.setProperty(“webdriver.gecko.driver”, “D:\\Softwares\\geckodriver.exe”);
//Launch the firefox browser with capability defined in above steps
WebDriver driver=new FirefoxDriver(dcap);
//Launch the required URL
driver.get(“https://www.lambdatest.com/”);
}
}
Step 3: Now, run the above code and see the expected result as shown in below image:
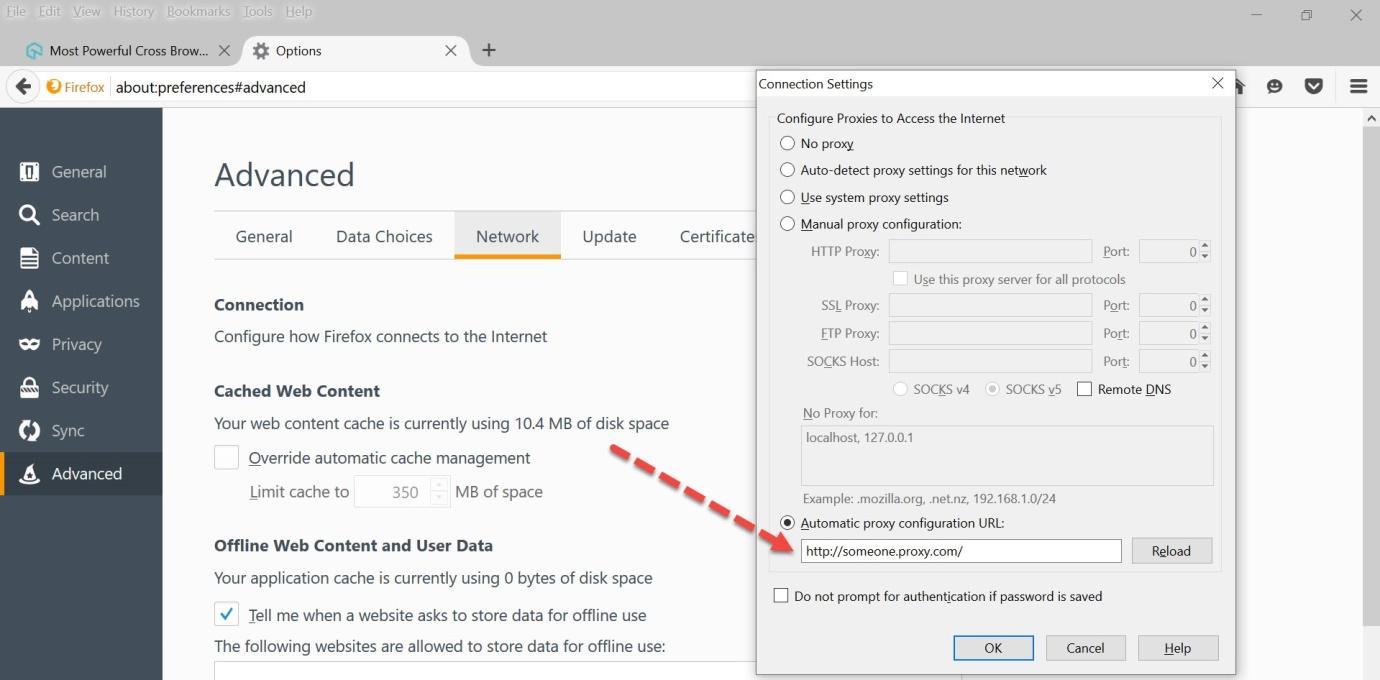
So, in the above image we can see that automatic proxy configuration URL is set through webdriver code. In the next section, let’s see how to handle alert based authentication through webdriver code.
- How to handle alert based authentication through webdriver code?
Sometimes, when we try to access any particular webpage, it gives us pop up in which username and password is required. We can handle those pop up with the help of Alert class present in selenium. So, in this section, let’s see that how to handle alert based authentication. Please follow below steps to achieve it:
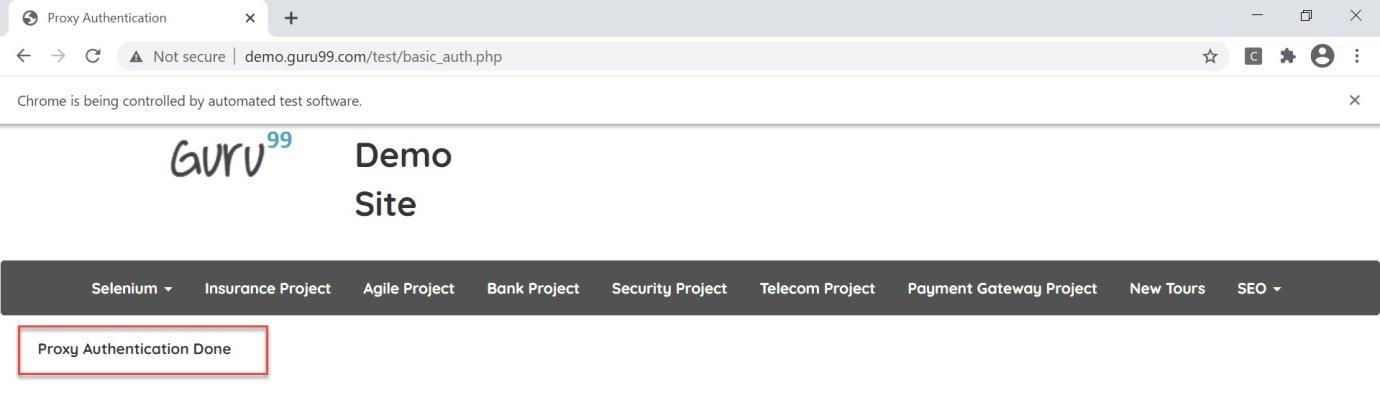
Step1: For demonstration purpose, we are taking the below URL of website Guru99 http://demo.guru99.com/test/basic_auth.php.

Step 2: Now, we need to write the below code to handle the alert based authentication through selenium webdriver code. Explanation of every line of code in mentioned against each line in the below code snippet.
package SeleniumSessions;
import org.openqa.selenium.Alert;
import org.openqa.selenium.By;
import org.openqa.selenium.WebDriver;
import org.openqa.selenium.chrome.ChromeDriver;
import org.testng.Assert;
public class AlertProxy {
public static void main(String[] args) {
//Set the path of gecko driver as we need to launch firefox browser
System.setProperty(“webdriver.chrome.driver”, “D:\\Softwares\\chromedriver.exe”);
//Launch the Chrome browser
WebDriver driver=new ChromeDriver();
//Launch the required URL
driver.get(“http://demo.guru99.com/test/basic_auth.php”);
//Handling Username alert
Alert alert = driver.switchTo().alert();
alert.sendKeys(“guru99”);
alert.accept();
//Handling Password alert
Alert alert1 = driver.switchTo().alert();
alert1.sendKeys(“guru99”);
alert1.accept();
//Validate Success Message Text
String text = driver.findElement(By.xpath(“/html/body/div/div[3]”)).getText();
Assert.assertTrue(text.contains(“Proxy Authentication Done”));
}
}
In this way we can handle alert based authentication popup in selenium webdriver. So, that’s all for this article.


