If you are a really serious video maker or if the video is your way of doing business then modifying background music is very important and can’t be ignored. Unfortunately, not everyone understands the procedure so if you ask your friends or relatives, you may be disappointed. Keep in mind that very few people understand how to add background music to a video.
Fortunately, today you are very spoiled by technological advances. You can do a lot of things that a few years ago was hard to do. You can add audio to a video. But how? Movavi gives you a great answer!
As we all know, background music has a dramatic effect on video, whether it’s video documentation, tutorials, or presentations. Movavi is aware of that and as one of the largest video editing software manufacturers; they offer Movavi Video Editor that anyone can easily download. You can download Movavi Video Editor and add any song or sound to your video in just a few minutes! This is a fantastic technological advancement. No matter what operating system you use, you can experiment with Movavi!
With Movavi you can add the soundtrack in many formats; WMA, OGG, MP3, MP4 and so forth. First of all you need to download Movavi Video Editor software and once finished downloading you can take action immediately. Make your project in full-featured mode in the welcome window. Anyone can do this and as information, all the files will be added on the Timeline board. All videos will be saved on Video Track and all audio will be stored in Audio Track. Movavi actually set both segments neatly.
Audio adjustment
Sometimes the video and soundtrack duration do not match each other but do not worry because you can edit each audio file in various ways. You may be able to move the red marker to the end of the video and click the Split button in case of an audio file longer than the video file. If the opposite happens, you can duplicate the audio file and place it in the same path.
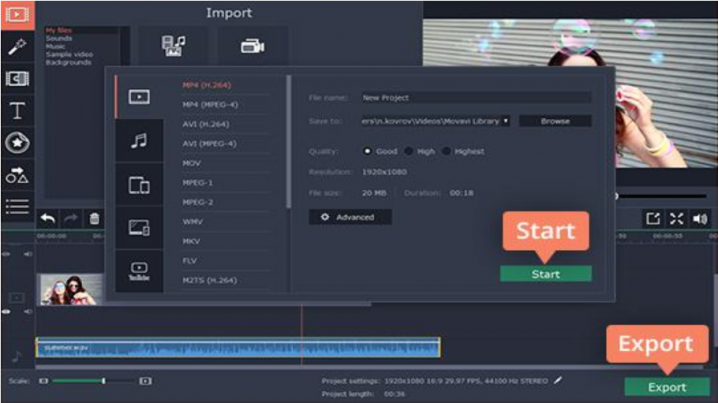
Saving results
Click export and all done from the tabs on the left side of the window. You simply select the desired storage format along with the storage destination folder. You simply press “save” and everything will run automatically.


